

I. 프로토타입 prototype
- 자바스크립트는 프로토타입 기반의 객체지향 프로그래밍을 지원하는 언어
- 오늘날에는 클래스가 더 널리 사용되지만, 사용하기에 따라 보다 강력하고 효율적
⭐ 자바스크립트의 모든 객체는 Prototype을 가짐
const obj = {};

console.log(obj);
[[Prototype]]펼쳐서 살펴볼 것
console.log(
  obj.toString()
);
console.log(
  obj.valueOf()
);
- 빈 객체임에도 위의 메서드들이 사용 가능한 것은 프로토타입 때문
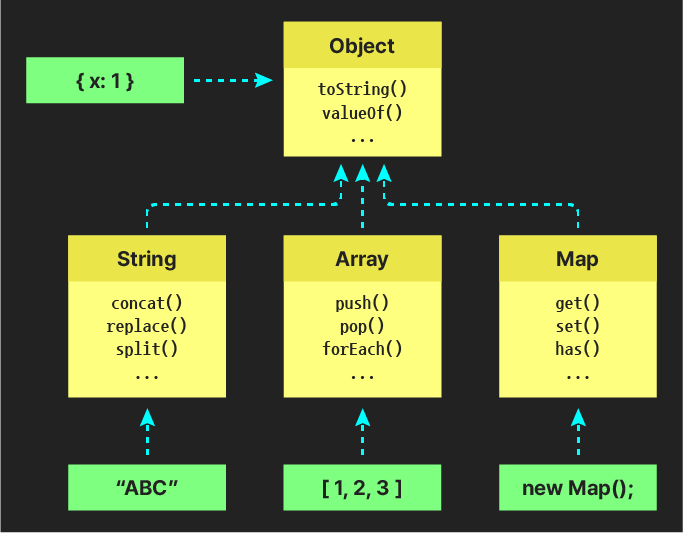
II. Object - 모든 것의 조상
- 아래 각 객체의
[[Prototype]]의[[Prototype]]이Object임 확인 - 각
[[Prototype]]의 메서드들 확인
console.log(
  new String('')
);
console.log(
  []
);
console.log(
  new Map()
);
-
constructor항목에서 각각의 생성자 확인 가능- 객체 리터럴(
{}등)의 생성자는Object()임 알 수 있음
- 객체 리터럴(
console.log(
  {}
);
💡 프로토타입 체인
- 특정 객체에 호출된 프로퍼티가 없다면 프로토타입을 거슬러 올라감
- 예: Array에는
valueOf가 없지만 그 프로토타입인Object에는 있으므로 호출 가능
II. 코드로 프로토타입에 접근하기
1. __proto__ 접근자 사용 - Object.prototype의 프로퍼티
- 👉 MDN 문서 보기
- ⚠️ Deprecated - 사라질 기능, 사용 권장되지 않음. 위의 링크 확인
console.log(
  {}.__proto__
);
console.log(
  new Number(2).__proto__
);
console.log(
  [1, 2, 3].__proto__
);
💡같은 종류는 프로토타입 공유 확인
console.log(
  {}.__proto__ === { x: 1, y: 2 }.__proto__
);
console.log(
  [1, 2, 3].__proto__ === [4, 5].__proto__
);
console.log(
  new String('가나다').__proto__ === new String('ABC').__proto__
);
💡최상위, 공통조상은 Object임 확인
console.log(
  {}.__proto__ === [].__proto__,
  {}.__proto__ === new Number(0).__proto__,
  [].__proto__ === new Number(0).__proto__
);
console.log(
  {}.__proto__ === [].__proto__.__proto__,
  {}.__proto__ === new Number(0).__proto__.__proto__,
  [].__proto__.__proto__ === new Number(0).__proto__.__proto__
);
// ⭐ 그 위로는 null
console.log(
  {}.__proto__.__proto__
);
2. Object.getPrototypeOf
- 수정할 때는
Object.setPrototypeOf사용 - ⭐
__proto__대신 이 기능을 사용할 것
console.log(
  Object.getPrototypeOf({})
);
console.log(
  Object.getPrototypeOf([]) === [].__proto__
);
3. ⭐ 생성자 함수에서는 prototype으로 프로토타입 접근 가능
- 즉
function으로 선언된 함수들에서
function Person (name) {
  this.name = name;
}
// 인스턴스들에 공유될 프로토타입에 다음과 같이 접근
console.log(Person.prototype);
const hong = new Person('홍길동');

console.log(hong);
[[Prototype]]이 두 단계로 있음 확인 (Person - Object)
console.log(
  String.prototype
);
console.log(
  Number.prototype
);
console.log(
  Set.prototype
);
// 생성자 함수로 동작하지 않는 빌트인 객체
console.log(
  Math.prototype
);
IV. 인스턴스 vs 프로토타입 프로퍼티
function YalcoChicken (name, no) {
  this.name = name;
  this.no = no;
  this.introduce = function () {
    return `안녕하세요, ${this.no}호 ${this.name}점입니다!`;
  }
}

const chain1 = new YalcoChicken('판교', 3);
// 본사에서 새 업무를 추가
YalcoChicken.prototype.introEng = function () {
  return `Welcome to Yalco Chicken at ${this.name}!`;
};

console.log(chain1.introEng());
console.log(new YalcoChicken('강남', 17).introEng());
⭐ 인스턴스의 로그를 펼쳐 각 함수가 속한 레벨 확인
console.log(chain1);
introduce: 만들어지는 인스턴스마다 각각 있음introEng: 프로토타입에만 있음 - 메모리 절약
💡 따라서 메모리 사용을 최소화하려면 아래와 같이 작성
function YalcoChicken (name, no) {
  this.name = name;
  this.no = no;
}

// 공통된 요소들은 프로토타입 프로퍼티로
YalcoChicken.prototype.titleEng = 'YalcoChicken';

YalcoChicken.prototype.introduce = function () {
  return `안녕하세요, ${this.no}호 ${this.name}점입니다!`;
}

YalcoChicken.prototype.introEng = function () {
  return `Welcome to ${this.titleEng} at ${this.name}!`;
};
const chain1 = new YalcoChicken('판교', 3);
const chain2 = new YalcoChicken('강남', 17);
const chain3 = new YalcoChicken('제주', 24);

console.log(chain1.introduce());
console.log(chain1.introEng());
// 인스턴스 레벨과 프로토타입 프로퍼티들 비교
console.log(chain1, chain2, chain3);
💡 프로토타입 레벨의 함수를 인스턴스 레벨에서 덮어쓰기 가능
const chain4 = new YalcoChicken('평양', 456);
chain4.introduce = function () {
  return `어서오시라요, ${this.no}호 ${this.name}점입네다!`;
}


console.log(chain4.introduce());
⭐ 클래스에도 적용 가능
class Dog {
  constructor (name) {
    this.name = name;
  }
}

Dog.prototype.sound = '멍멍';
Dog.prototype.bark = function () { // 메서드로 만드는 것과 같음
  console.log(this.sound)
};

const badugi = new Dog('바둑이');

badugi.bark();
console.log(badugi);
- 프로토타입 확인